Introduction to playlists
A playlist is a sequential list of video, audio or image files. The JW Player supports various scenarios to load, show and interact with such playlists.
An entry in the playlist is not just a URL to the media file, but an object that can have multiple properties, such as
file,
image,
title,
description,
provider and
duration. The more properties are provided, the more information the player can display about that entry.
Playback of a playlist can be customized by two configuration options:
repeat
This option defines what the player should do when an item finishes playback. The default is none (do nothing). It can be set to list (play the next entry until the entire list is done), always (keep on playing the entries forever) and single (re-play the current entry).
shuffle
By default, the player starts a playlist with the first entry and then plays all entries sequentially. Set this option to true to let the player randomly select which entry to play next.
Loading inline JSON playlists
The easiest way to load a playlist is to define it as a JavaScript object (JSON) your HTML code. The JW Embedder allows you to do this (this does not work with the SWFObject and <embed> methods). Here's an example:
<div id="container"></div>
<script type="text/javascript">
jwplayer("container").setup({
'flashplayer': 'jwplayer.swf',
'playlist': [{
'file': '/videos/video1.mp4',
'image': '/thumbs/video1.jpg',
'title': 'The first video'
},{
'file': '/videos/video2.mp4',
'image': '/thumbs/video2.jpg',
'title': 'The second video'
}],
repeat: 'list'
});
</script>
This code will result in a player with two videos, which will play back to back. In the controlbar, a previous entry and next entry button will appear. These can be used to navigate the playlist.
Loading external RSS playlists
Next to inline JSON playlists, it is possible to load external playlists into the JW Player. These external playlists should be in the (widely used) RSS format. The Yahoo! Media extension can be used to include media-specific data in the RSS feed (e.g. <:media:thumbnail> for the preview image).
The RSS feed can simply be loaded into the JW Player by assigning it to the file configuration option. Example:
<div id="container"></div>
<script type="text/javascript">
jwplayer("container").setup({
'flashplayer': '/assets/jwplayer.swf',
'file': '/assets/playlist.xml'
});
</script>
Note that JW Player supports additional playlist formats in Flash-only mode. For HTML5, the player only supports mediaRSS (as of version 5.7). Since mediaRSS is the industry standard for media playlists too, we strongly recommend you use this format.
Crossdomain loading
An important issue to keep in mind with playlists is that they cannot be loaded cross-domain. In other words, if your player is embedded at http://somesite.com, you cannot load an RSS playlist from http://othersite.com. This restriction applies to both Flash and HTML5. There are workarounds though:
You can place a small (PHP) script on the server that hosts your player to proxy the external playlist. This is the easiest solution which works for both Flash and HTML5.
If you're using only the Flash mode of JW Player (no HTML5), you can place a crossdomain.xml file on the server that hosts the playlists.
A very technical solution for HTML5 is to configure the server that hosts your playlists for Cross-Origin Resource Sharing.
Playlist UI component
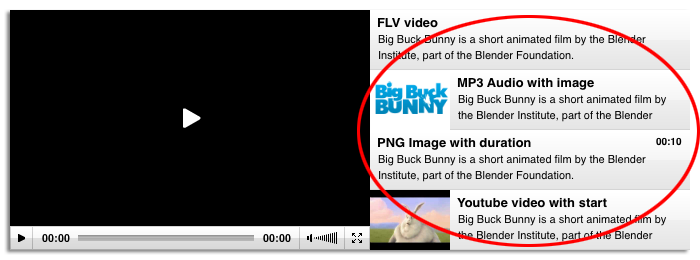
In addition to loading/playing a playlist, JW Player can display the list in a dedicated UI component. Users can scroll through the playlist and select the entry they want to view. An entry's image, title, description and duration are shown.
To enable the visual playlist, set the following two options:
playlist.position
Where to place the playlist relative to the video. Can be set to bottom or right.
playlist.size
Width (if position=right) or height (if position=bottom) of the playlist in pixels. The default is 180.
Here's how to set the Playlist UI in combination with an RSS feed:
<div id="container"></div>
<script type="text/javascript">
jwplayer('container').setup({
'file': '/assets/playlist.xml',
'flashplayer': '/assets/player.swf',
'width': '720',
'height': '240',
'playlist.position': 'right',
'playlist.size': '320'
});
</script>
The resulting player will look like this, with the playlist located at the right side:
In HTML5 mode, the playlist UI component will be displayed the same way, but note that in iOS, the default scrolling behavior is a bit different, requiring that the user use a two-finger swipe gesture to scroll the playlist. The JW Player includes support for the iScroll JavaScript library, which enables one-finger scrolling in iOS. Simply download the script and include it in your page's <head> tag to enable it:
<head>
<script type="text/javascript" src="/jwplayer/iscroll-4.js"></script>
</head>
Playlist skinning
JW Player supports a flexible skinning model that allows designers to dramatically change the look of a player. The playlist UI component can also get skinned, and many of the freely available skins do so.
Some skins (e.g. Modieus) assign each playlist entry lots of space, so a large description will fit. In other skins (e.g. Bekle), each playlist entry is very narrow, solely displaying the titles of the entries.
See our skin building guide for in-depth info on skinning the playlist UI component and the player in general.
Plugins & Providers
JW Player features an extensive plugin model for extending its functionality (e.g. for Captioning). The player also supports so-called providers to extend the underlying playback capabilities (e.g. for RTMP Streaming). Both plugins and providers supply configuration options that can be set per playlist entry.
For inline JSON playlists, you can simply insert these options in the HTML code. The options should be prepended with the name of the plugin/provider and a dot. Here's an example configuration that uses the captions plugin, with a dedicated captions file per playlist entry:
<div id="container"></div>
<script type="text/javascript">
jwplayer("container").setup({
'flashplayer': 'jwplayer.swf',
'playlist': [{
'file': '/videos/video1.mp4',
'title': 'The first video',
'captions.file': '/assets/captions1.txt'
},{
'file': '/videos/video2.mp4',
'title': 'The second video',
'captions.file': '/assets/captions2.txt'
}],
plugins: {
captions: {}
}
});
</script>
For external RSS playlists, you can use the jwplayer: extension to insert these custom properties. Here's the same example playlist in RSS format:
<rss version="2.0" xmlns:jwplayer="http://developer.longtailvideo.com/">
<channel>
<item>
<title>The first video</title>
<jwplayer:file>/videos/video1.mp4</jwplayer:file>
<jwplayer:captions.file>/assets/captions1.txt</jwplayer:captions.file>
</item>
<item>
<title>The second video</title>
<jwplayer:file>/videos/video2.mp4</jwplayer:file>
<jwplayer:captions.file>/assets/captions2.txt</jwplayer:captions.file>
</item>
</channel>
</rss>
Note the top level element, which describes the JW Player namespace using the xmlns:jwplayer attribute. This must be available in order to not break validity.
Keywords: JW Player, Playlist, Blogger, Blogger Tutorial, Blogger Embedding, Blog, Website.